
What's on this page
- Where appliance maintenance pays off
- Before you start
- Step 1: Clean the refrigerator coils and check the seals
- Step 2: Clear the dishwasher filter, spray arms, and descale
- Step 3: Clean the washer drum and gasket, and check the hoses
- Step 4: Clean the dryer lint trap and the full vent
- Step 5: Service the HVAC filters and condensate line
- Step 6: Maintain the oven, range, and range hood
- Step 7: Tend small appliances and water heater basics
- Step 8: Build a seasonal maintenance schedule
- A worked example: a full seasonal maintenance run
- Common mistakes in appliance maintenance
- Troubleshooting: harder maintenance calls
- Your appliance maintenance checklist
- The bottom line
Short answer: Maintain your appliances with eight surface-level jobs: refrigerator coils and seals, dishwasher filter and spray arms, washer drum and gasket, dryer lint and vent, air conditioner and dehumidifier filters and condensate, oven and hood, small appliances and the water heater, and a schedule. Run lint and filters monthly, seals every few months, and coils, vents, and descaling once or twice a year. Never skip the dryer vent, and leave gas and refrigerant to a professional.
An appliance rarely dies all at once. It slows down first: the dryer needs two cycles where it used to need one, the fridge hums a little longer each hour, the dishwasher leaves a film on the glasses. Almost always, that decline is not the machine wearing out but a maintenance job going undone, dust on the coils, lint in the vent, scale on a heating element, a filter nobody has rinsed in a year. The good news is that the fixes are simple, cheap, and well within reach of anyone willing to unplug a machine and spend a few minutes with a brush.
These notes give you an eight-point plan for maintaining the major appliances in a typical home, one appliance area at a time, so you extend their working life and stop paying for energy that dirt and clogs are wasting. Each step is a concrete job you can do yourself with basic tools, plus a clear line on what to hand to a professional. For the full running-cost picture behind why a clean machine is a cheaper one, see our notes on lowering your electric bill and our guide to choosing energy-efficient appliances. Feed your appliance count and how long it has been since you last serviced them into the maintenance planner as you read, and it will point you at where to start.
Key takeaways
- Most appliance decline is a missed maintenance job, not real wear: dusty coils, a clogged vent, scale on an element, or a filter nobody has rinsed.
- The whole plan is eight surface-level jobs, coils and seals, filter and spray arms, drum and gasket, lint and vent, filters and condensate, oven and hood, small appliances and water heater, and a schedule.
- A seasonal rhythm beats a heroic once-a-year blitz: monthly for lint and filters, every few months for seals and filters, once or twice a year for coils, vents, and descaling.
- The one job never to skip is the dryer vent: lint is flammable, and a choked vent is a fire risk, not just an efficiency drag.
- Stop at anything involving gas, sealed refrigerant, or mains wiring: those belong to a licensed professional, always.
Where appliance maintenance pays off
Before you pick up a brush, it helps to see what maintenance is actually buying you, because the payoff is not just a cleaner machine. Appliance maintenance returns value along three lines at once: it extends the working life of the appliance, it cuts the energy the appliance wastes when it is fighting dirt and clogs, and on a couple of appliances it directly reduces a safety risk. The stacked bar below shows an illustrative split of where that value lands across a typical home’s appliances, so you can see why the habit is worth building.
Where appliance maintenance pays off
An illustrative split of the value maintenance returns across a home's appliances. Segments sum to 100 percent. Your mix varies by appliance and habits.
Life and energy dominate across the whole home, but on the dryer the safety slice is the reason the vent job is non-negotiable. The exact split is illustrative and shifts by appliance.
The shape of that split is the strategy in one picture. Most of the value is the long life you get from a machine that never has to strain against its own dirt, plus the energy you stop wasting when every part runs unobstructed. The smaller safety slice is concentrated but critical: it is almost entirely the dryer vent, where the stakes are not dollars but fire risk. Keep that ranking in mind as you work the eight steps, because it tells you which jobs are about saving money over years and which one is about not skipping it at all. The steps that follow give you one repeatable method per appliance area, and the schedule in Step 8 ties them into a rhythm you can actually keep.
Before you start
This is a hands-on but low-skill task. Nothing in the eight steps requires a trade qualification, and every job here is the unplug-first, surface-level kind. Plan on roughly two hours for a full seasonal maintenance session if you tackle several appliances in one afternoon, and less if you spread the jobs across a few weekends. The difficulty is genuinely beginner: if you can vacuum, wipe a surface, and read a manual, you can do all of it.
Gather a small, ordinary kit before you begin so you are not stopping mid-job to hunt for a tool.
- A vacuum with a crevice tool or a coil brush, for the refrigerator coils, the dryer lint housing, and the vent.
- Microfiber cloths and a mild all-purpose or appliance-safe cleaner, plus white vinegar or a commercial descaler for scale.
- A soft brush or old toothbrush, for spray arm holes, gasket folds, and filter mesh.
- A screwdriver and a flashlight, for access panels and dark cavities behind machines.
- Your appliance manuals, or the model numbers so you can look them up, since the manual is the authority on filters, cycles, and what not to open.
Two ground rules make the whole plan safe. First, unplug an appliance, or switch off its circuit, before you clean anything beyond an external surface, and turn off the water supply before touching a hose. Second, know your stopping line: anything involving gas, sealed refrigerant, or mains wiring is a job for a licensed professional, not a weekend project. With your kit assembled and those two rules in mind, start at the appliance that quietly costs you the most when it is neglected: the refrigerator.
Step 1: Clean the refrigerator coils and check the seals
Your refrigerator runs every hour of every day, which makes it the appliance where neglect adds up fastest. The single most valuable job is cleaning the condenser coils. These coils shed the heat the fridge pulls out of your food, and when they are blanketed in dust, pet hair, and kitchen grease, they cannot release that heat efficiently, so the compressor runs longer and works harder to hold temperature. Pull the fridge out from the wall, or remove the front kick plate if the coils are underneath, unplug the unit, and gently vacuum the coils with a crevice tool, finishing with a coil brush for what the vacuum misses. Doing this a couple of times a year keeps the compressor from straining and is one of the clearest maintenance-to-energy links in the house.
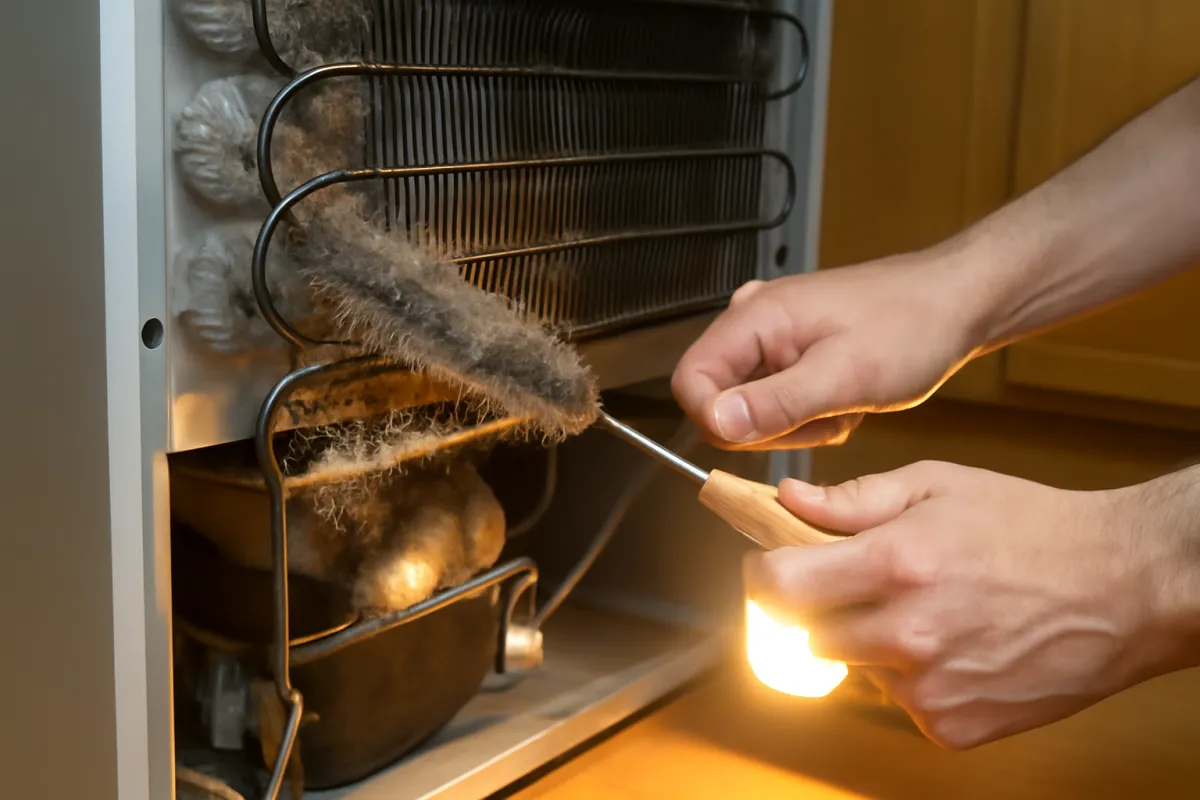
While you are there, check the door seals, the rubber gaskets that keep cold air in. Wipe them clean with mild soapy water, since crumbs and stickiness stop them sealing, and dry them. Then test the seal by closing the door on a slip of paper: if it pulls out with almost no resistance, the gasket may be failing and letting cold air leak, which makes the compressor work overtime. Also keep the fridge a sensible few inches off the wall for airflow, and vacuum any dust off the top. Watch out for one thing: unplug the unit before reaching into the coil area, and be gentle, because the coils and the fan back there can be damaged by rough handling. For the full picture of what an always-on fridge costs and how age changes it, see our refrigerator running-cost report.
Step 2: Clear the dishwasher filter, spray arms, and descale
A dishwasher that leaves grit or film on clean dishes is almost never broken; it is clogged. The heart of the job is the filter at the bottom of the tub, a cylindrical or flat mesh assembly that traps food so it does not recirculate onto your dishes. Most modern dishwashers let you twist and lift the filter out by hand. Pull it, rinse it under a running tap, and use a soft brush to clear the mesh of trapped food and grease, then seat it back firmly. A filter left unrinsed for months is the usual reason a dishwasher starts smelling or leaving residue, and clearing it is a five-minute job you can do every few weeks.
Next, look at the spray arms, the rotating bars that fling water over the dishes. Their small holes clog with mineral scale and food debris, which weakens the spray pattern and leaves dishes on the top rack poorly cleaned. Lift or unscrew the arms if your model allows, and poke each blocked hole clear with a toothpick or a soft brush, then check the arms spin freely. Finally, descale the machine. Run an empty hot cycle with a dishwasher-safe descaler or a bowl of white vinegar on the top rack to dissolve the scale and grease film that builds up on the interior, especially if you have hard water. This keeps the heating element and interior working efficiently.
Watch out for a couple of things. Do not run the machine with the filter removed, and reseat it correctly, because a loose filter lets food back into the pump. And if your glassware is persistently cloudy, that is a hard-water scale sign telling you to descale more often, not a broken machine. For what a dishwasher costs to run per load and how heated dry changes it, see our dishwasher running-cost report.
Step 3: Clean the washer drum and gasket, and check the hoses
A washing machine washes your clothes, but nothing washes the machine, so it slowly accumulates detergent residue, body oils, and, in front-loaders, a damp film that breeds odor. The fix is a maintenance wash. Run an empty cycle on the hottest setting with a washing-machine cleaner or a measured dose of white vinegar to strip the buildup from the drum and internal parts. If your machine has a dedicated tub-clean cycle, use it. Doing this every month or two keeps the drum fresh and stops the musty smell that makes clean laundry smell anything but clean.
Front-loaders need one extra job: the rubber door gasket. Peel back its folds and wipe out the trapped water, hair, lint, and gray slime that collect in the crevice, since this is the number one source of front-loader odor and mold. Dry it, and leave the door ajar between washes so the drum can air out rather than sitting damp and sealed. On a top-loader, wipe around the rim and dispenser where residue gathers. Pull and rinse the detergent drawer too, as it grows its own film.

Then check the fill hoses behind the machine. Turn off the water supply, and inspect the rubber hoses for bulges, cracks, or dampness at the fittings, because a burst washer hose is a classic cause of a flooded laundry room. Many people replace rubber hoses periodically, or upgrade to braided stainless steel ones for peace of mind. Watch out for overloading and overdosing detergent, both of which accelerate residue buildup, and never ignore a hose that looks tired. Our washing-machine running-cost report covers how wash temperature drives the energy side.
Step 4: Clean the dryer lint trap and the full vent
This is the step that is about safety, not just efficiency, so it is the one never to skip. Every load your dryer runs sheds lint, and lint is highly flammable. The lint trap catches only part of it; the rest travels through the vent duct behind the dryer and out through the wall, packing tighter over time, especially at bends. A vent choked with lint restricts airflow, traps heat, makes loads take longer to dry, and raises a genuine fire risk. There are two jobs here, and both matter.
First, the lint trap, every single load. Pull the screen and clear the lint by hand before or after each cycle, so it never gets a head start. Once every few months, wash the screen in warm soapy water to remove the invisible film that fabric softener and dryer sheets leave, which can restrict airflow even on a screen that looks clean. A quick test: run water over the screen, and if it pools instead of passing through, the film needs washing off.
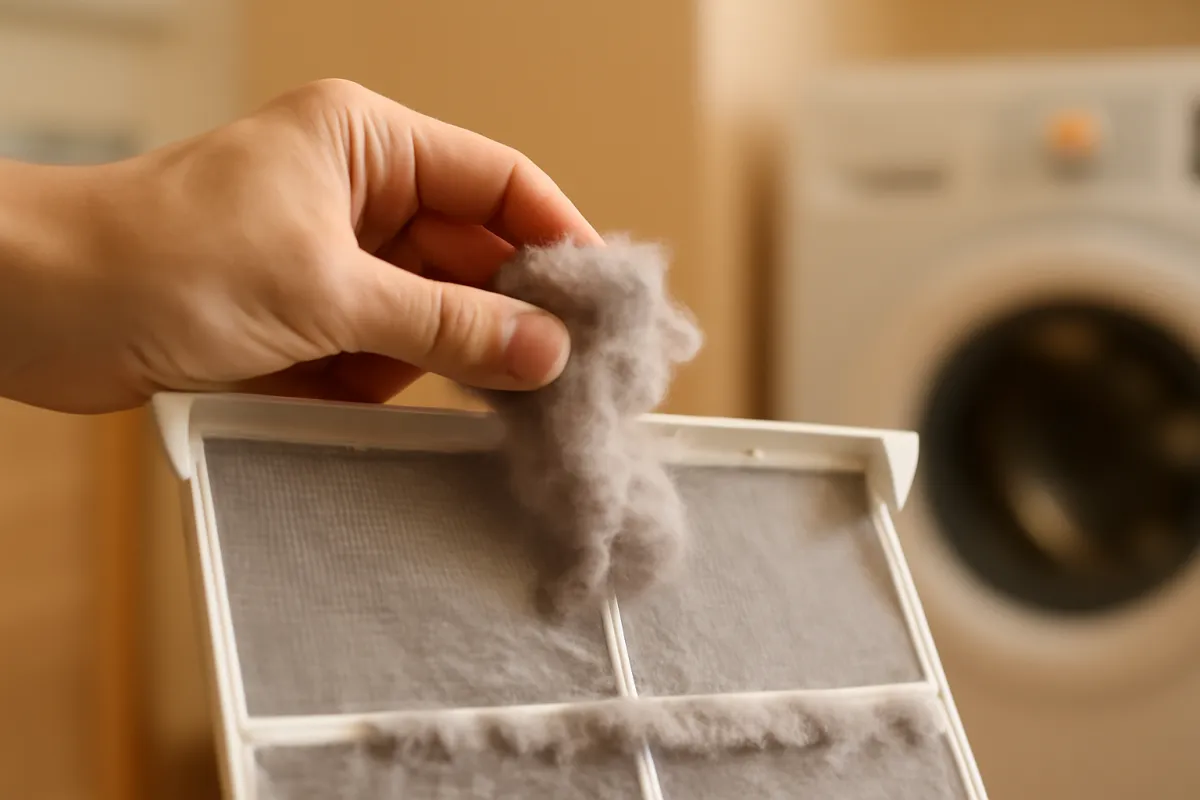
Second, the full vent run, at least once a year. Unplug the dryer, pull it out, disconnect the duct, and clear the lint from the duct, the wall opening, and the exterior vent flap using a vacuum and a dryer-vent brush kit. Confirm the exterior flap opens freely and is not blocked. Watch out for warning signs between cleanings: loads taking much longer to dry, the dryer or room feeling unusually hot, or a burning smell all mean clean the vent now. If the run is long, buried in walls, or you are unsure, hire a professional duct cleaning rather than guessing. For what a dryer costs per load and why a clogged vent inflates that, see our dryer running-cost report.
Step 5: Service the HVAC filters and condensate line
Your heating and cooling system is usually the largest energy user in the home, which makes its maintenance the highest-leverage job for the bill even though the system is easy to forget behind a wall or in a closet. The core task is the air filter. A dirty filter chokes airflow, forcing the blower to strain and the system to run longer for the same comfort, and it lets dust through onto the coils where it does real harm. Check the filter monthly and replace or clean it on the schedule the manufacturer specifies, more often if you have pets, run the system hard, or see it grayed with dust. Matching the filter size and type to your system matters, so note the size printed on the old filter before you buy.
For a central air conditioner or heat pump, the condensate line is the second job. As the system cools, it pulls moisture from the air, and that water drains away through a condensate line. Algae and gunk can clog that line and cause water to back up, which is a common source of a leaking or shut-down system in cooling season. Locate the drain line and its access point, and clear it per your manual, some homeowners flush it periodically to keep it running. Keep the outdoor condenser unit clear of leaves, grass clippings, and debris, and gently rinse its fins if they are caked, so it can shed heat.
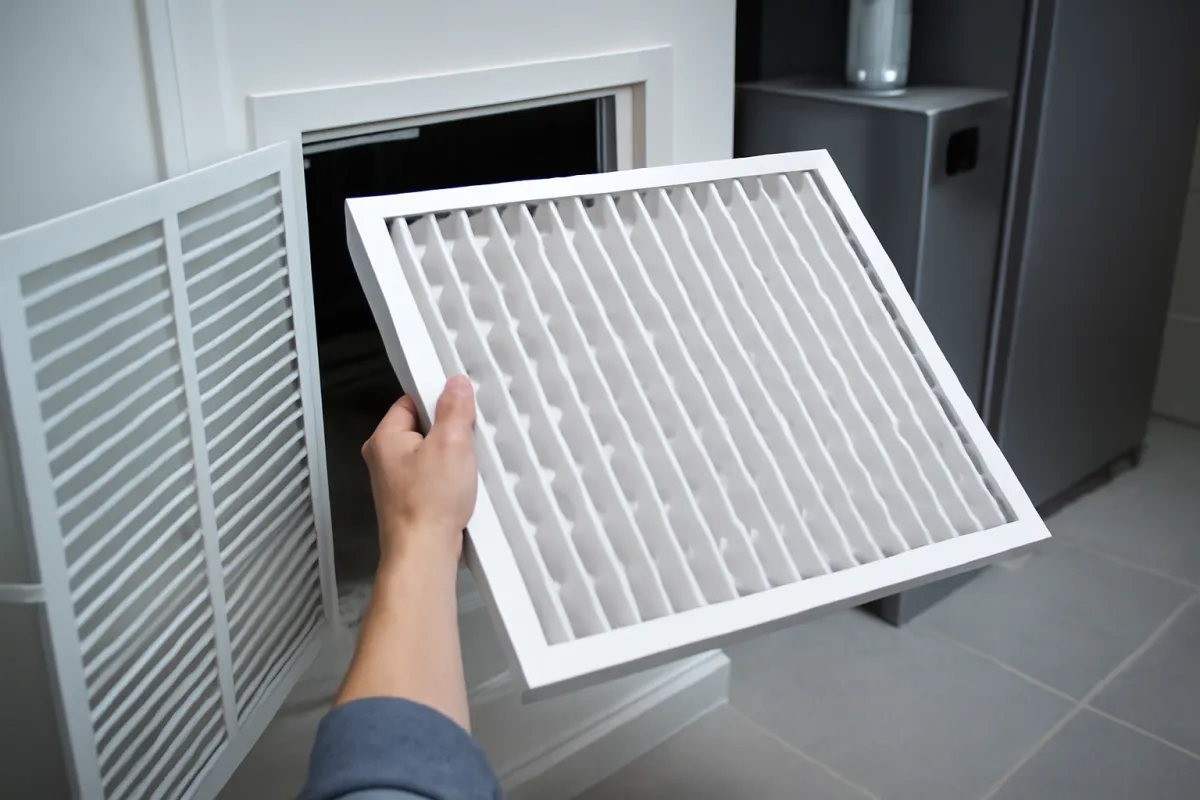
Watch out for the line between owner maintenance and pro service. Changing filters, clearing debris, and flushing an accessible drain are yours; anything involving refrigerant, the sealed system, or electrical components is a licensed technician’s job, and a yearly professional tune-up is a sensible complement to your filter habit. Our air conditioner running-cost report shows why a straining system costs so much more to run.
Step 6: Maintain the oven, range, and range hood
The cooking appliances get greasy rather than clogged, and the maintenance is mostly about cleanliness that protects performance and safety. Start with the oven interior. Baked-on spills and grease build up over time, smoke when the oven heats, and can affect how evenly it cooks. Clean the interior periodically, either with the oven’s self-clean cycle if it has one and you follow the manual’s guidance, or by hand with an oven-safe cleaner. Wipe up big spills soon after they cool rather than letting them carbonize, which makes the job far easier. Keep the door seal and glass clean so the oven holds heat well.
For the cooktop, the maintenance depends on the type. On any range, keep burners and the surface clean of spills and grease so nothing smokes or interferes with even heating. On a gas range, keep the burner ports clear so the flame burns evenly, wiping the surface and removing any debris from the burner heads, but leave anything beyond surface cleaning, the gas connection, the valves, the internal components, to a qualified professional, because gas is not a place to improvise. On an electric or induction cooktop, wipe the surface clean and avoid abrasive pads that scratch glass.
The range hood is the part people forget, and it does real work pulling grease and moisture out of your cooking air. Its grease filters, the metal mesh panels under the hood, clog with a greasy film that reduces airflow and, when saturated, becomes its own fire concern near the cooktop. Pull the mesh filters and wash them, degreasing them in hot soapy water or the dishwasher if the manufacturer allows, every month or two depending on how much you cook. If your hood uses a charcoal filter for a recirculating setup, replace it per the manual. Watch out for running a cooktop under a clogged hood, which lets grease and moisture settle around your kitchen instead of venting away, and never treat a gas smell as routine, that is an immediate stop-and-call situation.
Step 7: Tend small appliances and water heater basics
The small appliances are easy to overlook because each one is minor, but together they are where quick habits keep things running and safe. Descale the kettle and coffee maker, which build scale fast from heated water, by running a vinegar or descaler solution through them periodically, especially with hard water, since scale slows heating and affects taste. Empty and wipe the microwave, clean the toaster crumb tray so crumbs do not smoke or char, and keep the blender and food processor blades and seals clean and dry. Check the cords on small appliances for fraying, and retire anything with damaged wiring rather than nursing it along, because a frayed cord is a shock and fire risk not worth the saved dollars.
The water heater is a larger appliance with a simple maintenance basic and a firm safety boundary. Over time, sediment settles at the bottom of a tank water heater, which can reduce efficiency and, with hard water, build up faster. Many manufacturers recommend periodically draining a few gallons or flushing the tank to clear that sediment, and doing so per your manual keeps the heater running closer to its rated efficiency. Insulating exposed hot-water pipes and confirming a sensible temperature setting are gentle, worthwhile touches that also trim standby losses.
Watch out for the hard stop here. A water heater involves either gas combustion or a high-current electrical element plus a pressure-relief valve, so beyond a basic drain that your manual explicitly describes, service belongs to a professional. Never tamper with the pressure-relief valve, the gas supply, or the electrical connections. If you smell gas, see corrosion or leaking around the tank, or the heater is old and unreliable, call a qualified technician, and weigh repair against replacement using the same logic as any appliance. Our notes on lowering your electric bill cover water-heating settings among the habits that quietly move the bill.
Step 8: Build a seasonal maintenance schedule
The seven jobs above only pay off if they actually happen, and the reliable way to make them happen is to stop treating maintenance as a single dreaded event and turn it into a light seasonal rhythm. The trick is to sort each task by how fast the thing it fights builds up, then attach it to a trigger you will not forget. The chart below groups the plan’s tasks by how often they need doing, so you can see that most of the work is infrequent and only a couple of jobs are truly monthly.
Maintenance tasks by frequency
An illustrative count of appliance-maintenance tasks that fall into each interval. Bars scale with the number of tasks. Your list varies by home.
Only the fast-building jobs, the lint trap and the filters, are monthly. The heavier jobs, coils, vents, and descaling, come round just once or twice a year. Counts are illustrative.
Turn that grouping into a calendar you can keep. Make the monthly jobs, the dryer lint film wash, the heating and cooling filter check, the dishwasher filter rinse, and the range hood filter, a first-of-the-month habit, so they ride on a date rather than your memory. Attach the twice-a-year jobs, the fridge coils, the dishwasher descale, the washer maintenance wash, and a deeper heating and cooling check, to the change of seasons, spring and fall, which are natural triggers. Slot the once-a-year jobs, the full dryer vent clearing, the water heater flush, and the oven deep clean, to a fixed anchor like a birthday or a holiday weekend so they never drift. Set the number of major appliances you keep and how long since you last serviced them in the maintenance planner to get a starting read on how urgent your next session is. Watch out for the classic failure of the plan, which is not the doing but the remembering, so use phone reminders and let the seasons carry the load.
A worked example: a full seasonal maintenance run
Put the eight points together on one illustrative afternoon so you can see how a seasonal run flows. Picture a household with six major appliances, a refrigerator, a dishwasher, a washer, a dryer, a central air conditioner, and an oven with a range hood, that has not had a proper maintenance session in over a year. It is early fall, a natural seasonal trigger, so this is a twice-a-year session that also sweeps up the once-a-year jobs that are overdue.
The run starts in the kitchen. The fridge is pulled out, unplugged, and its coils, thick with a year of dust, are vacuumed and brushed, and the seals wiped and paper-tested. That single job is the one most likely to have been quietly inflating the compressor’s runtime. The dishwasher filter, which had not been rinsed in months, is pulled and cleared, the spray arm holes poked clean, and an empty descaling cycle set to run. The oven gets a deep clean, and the range hood mesh filters, greasy and airflow-choked, go into hot soapy water.
Then the laundry pair. The washer runs a hot maintenance wash while its gasket folds are wiped out and the fill hoses checked for bulges. The dryer gets the job that matters most: the lint screen is washed of its invisible film, and the full vent run, packed with a year of lint at the elbow, is disconnected and cleared, which is both the fire-safety win and the reason recent loads had been drying slowly. Finally the central air conditioner’s filter, grayed and restricting airflow, is swapped for a fresh one and the condensate line checked.
By the end of the afternoon, the household has extended the life of six appliances, removed the airflow and scale restrictions that were wasting energy, and cleared the vent that was a genuine fire risk, the three payoff lines from the chart, all in one session. None of the numbers here are measured on any specific home, they are an illustrative walkthrough, and your own appliances, intervals, and buildup will differ. The value is the sequence: work room by room, do the highest-leverage job in each, and let the seasonal trigger bring you back.
Common mistakes in appliance maintenance
Most appliance trouble traces back to a small number of avoidable habits rather than bad luck. These are the pitfalls that quietly shorten an appliance’s life or, in one case, create a hazard.
- Never cleaning the refrigerator coils. Because the coils are hidden behind or beneath the fridge, they are the most-skipped job in the house, and dust on them makes the compressor run longer for years. Vacuum them a couple of times a year and the always-on appliance stops straining.
- Ignoring the dryer vent. Clearing the lint trap but never the vent run behind the dryer is the dangerous mistake, because lint is flammable and a choked vent is a fire risk as well as an efficiency drain. Clear the full run at least yearly, and act on slow-drying loads immediately.
- Skipping the washer gasket and drum. Leaving the door sealed and the gasket unwiped is why front-loaders turn musty, and skipping the maintenance wash lets residue build. Wipe the gasket, run a hot clean cycle, and leave the door ajar between washes.
- Forgetting the heating and cooling filter. A filter left in for months chokes the largest load in the house, wasting energy and letting dust onto the coils. Check it monthly and change it on the manufacturer’s schedule, more often with pets.
- Do-it-yourselfing gas, refrigerant, or electrical work you should not. Trying to service a gas line, recharge a sealed system, or open wired-in components to save money is how a maintenance job becomes a gas leak, a shock, or a voided warranty. Hand those to a licensed professional, every time.
- Waiting for a breakdown to start. Deferring all maintenance until something fails means removing years of buildup at once and often replacing a machine that a little regular attention would have carried. Start the habits while an appliance is healthy, even when it is new.
Clear these six and you have removed the causes behind most premature appliance failures, at the cost of a few minutes a month and an afternoon a season.
Troubleshooting: harder maintenance calls
The eight steps cover routine upkeep, but some situations need a judgment call. Here is how to think through the common ones without guessing.
What if an appliance is running poorly even after I clean it? First confirm the obvious maintenance is actually done, since a fridge that still struggles may have a failing door seal, a dryer that still runs long may have a vent you cleared only partway, and a dishwasher that still films may need more frequent descaling in hard water. If the basic cleaning is genuinely done and the symptom persists, that points past maintenance toward a component that needs professional diagnosis, so note what you have already ruled out before you call someone, because it saves time and money.
What if I am not sure whether to repair or replace? Weigh three things together: the repair cost against the price of a new unit, the appliance’s age against its expected life, and how much it costs you to run. A rule of thumb many people use is that a repair costing a large share of a new appliance, on a unit already well into its life, tips toward replacement, while a modest repair on a young appliance is usually worth it. Treat any percentage rule as illustrative, factor in repair history, and let our running-cost reports show whether an old unit is also costing you on the energy side.
What about my warranty? Routine maintenance generally supports a warranty, since manufacturers expect owners to keep filters, coils, and vents clean, and neglect that causes a failure can sometimes affect coverage. What can cause trouble is opening a sealed system or forcing an unqualified repair. Keep your receipts and records, follow the manual’s maintenance guidance, and hand anything requiring internal access to an authorized professional. Always confirm your specific product’s terms, since they vary.
What if I have hard water? Hard water leaves scale on every surface that heats water, so you will see faster buildup and cloudy glassware. The answer is not a different method but a shorter interval: descale the dishwasher and attend to the washer and water heater more often than a soft-water home would, and let what you see on the glassware set your pace rather than a fixed calendar.
Your appliance maintenance checklist
Save this list and work it by interval. Clearing it keeps every appliance running closer to how it was designed to, and flags the one job that is about safety.
- Every load or month: clear the dryer lint trap each load, check the heating and cooling filter, rinse the dishwasher filter, and wipe the range hood area.
- Every few months: wash the dryer lint screen film off, wipe the fridge door seals, clean the dishwasher spray arms, run a washer maintenance wash and wipe the gasket, and degrease the range hood filters.
- Twice a year: vacuum the refrigerator condenser coils, descale the dishwasher, and give the heating and cooling system a deeper check plus a professional tune-up around the season change.
- Once a year: clear the full dryer vent run end to end, flush the water heater per the manual, and deep-clean the oven interior.
- Every few years: replace or upgrade the washer fill hoses, and reassess any aging appliance on repair-versus-replace.
- Always hand to a professional: anything involving gas, sealed refrigerant, or mains electrical wiring, no exceptions.
Set your appliance count and last-serviced status in the maintenance planner to see where your next session should start, then work the list one interval at a time.
The bottom line
Maintaining your appliances is not a specialist skill or an expensive habit; it is a handful of simple jobs done on a rhythm that stops small neglect from becoming premature failure. Clean the refrigerator coils and check the seals, clear the dishwasher filter and spray arms and descale, run the washer clean and wipe the gasket, clear the dryer lint trap every load and the full vent every year, change the heating and cooling filter and clear the condensate, keep the oven and range and hood clean, tend the small appliances and the water heater basics, and tie it all to a seasonal schedule so it actually happens. The payoff comes on three lines at once: appliances that last longer, energy you stop wasting on machines fighting their own dirt, and, on the dryer especially, a real safety risk removed. Do the surface-level jobs yourself, hand anything with gas, refrigerant, or wiring to a licensed professional, and let the seasons carry the calendar. Do that, and your appliances will keep quietly working instead of quietly declining, which is the entire point of maintaining them before they make you replace them.
A note on scope: these notes exist to hand you a repeatable routine for maintaining common home appliances, not to promise any specific saving or lifespan. Every interval, count, and figure above is an illustrative planning number drawn from typical guidance rather than measured on one home, and your own appliances, water hardness, usage, and manufacturer instructions will change what and how often you should do each job, so treat your product manuals as the authority. Nothing here is professional advice. Any task involving gas, sealed refrigerant, mains electrical wiring, or a pressure-relief valve belongs to a qualified, licensed professional, and if you smell gas or suspect an electrical fault, stop and call one.
Frequently asked questions
How often should I maintain my home appliances?
A workable rule is to match each task to how fast the thing it fights builds up. Some jobs are monthly, like emptying and rinsing the dryer lint trap and checking the heating and cooling filter, because lint and dust accumulate quickly. Others are every few months, like wiping the refrigerator door seals and rinsing the dishwasher filter. A handful are once or twice a year, like vacuuming the refrigerator condenser coils, cleaning the full dryer vent run, and descaling the dishwasher. The honest answer is that the interval depends on your household, your water hardness, and whether you have pets that shed, so treat any schedule as a starting point and shorten the intervals if you see dust, lint, or scale building faster. The point is regular attention, not a perfect calendar.
Does cleaning appliance parts actually save energy?
In many cases yes, because a clogged or dirty component forces the appliance to work harder for the same result. Dusty refrigerator coils make the compressor run longer to shed heat, a blocked heating and cooling filter makes the blower strain against the restriction, and a clothes dryer with a lint-choked vent takes more cycles to dry a load. Each of those is wasted energy you are paying for. The size of the saving is impossible to state as a single number because it depends on how dirty the part was and how hard you run the appliance, so treat any figure as illustrative rather than a promise. What is reliable is the direction: a clean, unobstructed appliance runs closer to how it was designed to run, which is both cheaper and gentler on the machine.
Is a clogged dryer vent really a fire risk?
Lint is highly flammable, and a clothes dryer vent that fills with it restricts airflow and traps heat, which is why a blocked vent is treated as a genuine fire hazard rather than just an efficiency problem. The lint trap catches only part of what a load sheds, and the rest travels into the vent run behind the dryer and out through the wall. Over time that duct can pack with lint, especially where it bends. Signs to watch for include loads taking longer to dry, the dryer or laundry room feeling unusually hot, or a burning smell. Cleaning the lint trap every load and clearing the full vent run at least once a year is the core of the safety habit. If the run is long, buried in walls, or you are unsure, a professional duct cleaning is a reasonable call rather than a luxury.
What appliance maintenance should I never do myself?
Anything that involves gas, sealed refrigerant, or opening up mains electrical wiring belongs to a licensed professional, full stop. That includes servicing a gas line or gas burner beyond wiping the surface, recharging or repairing a sealed refrigeration or air conditioning system, and any repair that means opening a wired-in appliance or a breaker panel. The maintenance in these notes is deliberately the surface-level, unplug-first kind: cleaning coils, filters, gaskets, and vents, and checking hoses. If a job asks you to cut into a gas connection, handle refrigerant, or rewire something, that is your signal to stop and call a qualified technician. The money you might save is never worth a gas leak, an electric shock, or a voided warranty, and a professional will spot problems you would not.
How does hard water affect my appliances?
Hard water carries dissolved minerals that leave scale behind as the water heats and evaporates, and that scale slowly coats the inside of any appliance that heats water. In a dishwasher it clouds glassware and clogs the spray arm holes; in a clothes washer and a water heater it builds up on heating surfaces and can reduce efficiency over time. If you have hard water, you will typically see faster scale buildup and cloudy residue, which is your cue to descale more often than a soft-water household would. Regular descaling of the dishwasher, periodic attention to the washer, and following the manufacturer's guidance for the water heater all help. There is no single correct interval because water hardness varies widely by area, so let what you see on the glassware and heating surfaces set your pace rather than a fixed rule.
When should I repair an appliance versus replace it?
A common rule of thumb is to weigh the repair cost against the price and age of the appliance: if a repair costs a large fraction of a new unit and the appliance is already well into its expected life, replacement often makes more sense, while a modest repair on a relatively young appliance usually wins. Reliability history matters too, because a machine that has needed several repairs is likely to need more. Energy use is the third factor, since a very old appliance can cost noticeably more to run than a new efficient one, which our running-cost reports work through appliance by appliance. There is no universal cutoff, so treat any percentage rule as illustrative and combine it with the appliance's age, its repair history, and how much it costs you to run before deciding.
Will regular maintenance void or protect my warranty?
Routine maintenance generally supports a warranty rather than voiding it, because manufacturers expect owners to keep filters clean, coils clear, and the appliance used as intended, and some warranties can be affected if neglect causes a failure. What can cause problems is the opposite: opening up a sealed system, forcing a repair you are not qualified for, or using the appliance in a way the manual warns against. The safe path is to do the surface-level cleaning the manual describes, keep any receipts and records, and hand anything that requires opening the machine or touching gas, refrigerant, or wiring to an authorized professional. Always check your specific product's manual and warranty terms, since they vary by manufacturer and model, and confirm before doing anything you are unsure about.
Do I really need to maintain a new appliance?
Yes, and starting maintenance while an appliance is new is the easiest way to keep it running well, because you are preventing buildup rather than trying to remove years of it. A new refrigerator still collects dust on its coils, a new dryer still sheds lint into its vent, and a new dishwasher still catches food in its filter. The intervals can be gentle at first, but the habits, checking the lint trap, wiping the seals, rinsing the filter, are worth establishing from day one. Doing so also helps you notice early when something is off, like a load taking longer to dry, which is far easier to address early than late. Think of new-appliance maintenance as protecting the investment you just made rather than a chore you can defer until something goes wrong.